孤独泪个人博客


  • 首页

  • 分类

  • 关于

  • 归档

  • 标签

  • 公益404

  • 搜索

利用squid代理+stunnel加密翻墙

发表于 2017-04-28 | 分类于 网络技术 |

一.准备工作:

操作系统:Centos6.5,

香港机器:安装Squid与stunnel服务器端,IP:1.1.1.1

国内机器:安装stunnel客户端,IP:172.16.1.1

二.开始安装

1. yum–y install squid

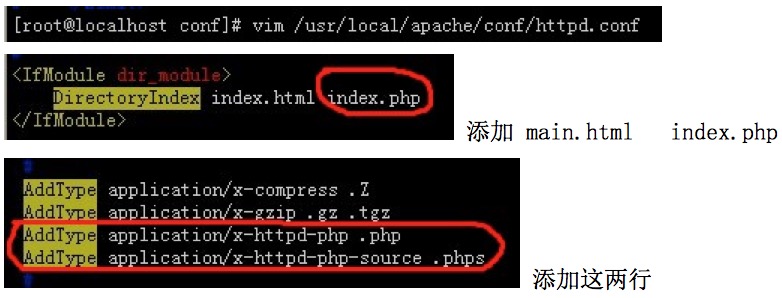
 vi /etc/squid/squid.conf         编辑配置文件

将 http_access deny all改为http_access allow all
将 http_port 3128改为http_port 1.1.1.1:3128

2. squid -k parse         检查配置参数是否有错

squid –z                   生成缓存

service squid restart              启动服务

3. yum–y install stunnel 安装stunnel


4. cd /etc/stunnel

opensslreq -new -x509 -days 365 -nodes -out stunnel.pem -keyout stunnel.pem       生成一个密钥文件

opensslgendh 512>> stunnel.pem       生成Diffie-Hellman部分

5. 默认配置文件在/usr/share/doc/stunnel-4.29/stunnel.conf-sample下,这里我手动创建一个


vi stunnel.conf

cert= /etc/stunnel/stunnel.pem
CAfile= /etc/stunnel/stunnel.pem
socket= l:TCP_NODELAY=1
socket= r:TCP_NODELAY=1
;;;chroot= /var/run/stunnel
pid= /tmp/stunnel.pid
verify= 3
;;;CApath = certs
;;;CRLpath = crls
;;;CRLfile = crls.pem
setuid= stunnel stunnel用户
setgid= stunnel stunnel组
;;;client=yes
compression= zlib
;;;taskbar = no
delay= no
;;;failover = rr
;;;failover = prio
sslVersion= SSLv3
debug= 4
syslog= no
output= stunnel.log
[sproxy]
accept= 8888 stunnel监听的端口,需要客户端指向
connect= 1.1.1.1:3128 本地squid监听端口

6. groupadd -g 122 stunnel           创建组

       useradd -c stunnel -d /nonexistent -m -g 122 -u 122 stunnel          创建用户

7. stunnel 启动服务

8. 防火墙添加信任端口

iptables -A INPUT -m state –state NEW -mtcp -p tcp –dport 8888 -j ACCEPT

iptables -A INPUT -m state –state NEW -m tcp-p tcp –dport 3128 -j ACCEPT

/etc/init.d/iptables save

service iptables restart

9. chkconfigsquid on 开机自动启动

10. vi /etc/rc.local 配置开机允许stunnel

stunnel

11. 国内stunnelclient配置

yum –y install stunnnel

scp –r root@1.1.1.1:/etc/stunnel/stunnel.pem/etc/stunnel拷贝国外主服务器生成的密钥文件

vi /etc/stunnel/stunnel.conf 编辑配置文件

cert= /etc/stunnel/stunnel.pem
socket= l:TCP_NODELAY=1
socket= r:TCP_NODELAY=1
verify= 2
CAfile= /etc/stunnel/stunnel.pem
client=yes
compression= zlib
ciphers= AES256-SHA
delay= no
failover= prio
sslVersion= SSLv3
[sproxy]
accept= 172.16.1.1:8080 用户代理的端口
connect= 1.1.1.1:8888 国外服务器的IP及所监听的端口

12. stunnel 启动stunnel

13. 防火墙添加信任端口

iptables-A INPUT -m state –state NEW -m tcp -p tcp –dport 8080 -j ACCEPT

/etc/init.d/iptables save

service iptables restart

14. vi /etc/rc.local

stunnel

OK,所有配置完毕,可以在浏览器上挂代理了172.16.1.1:8080

华为S7706配置

发表于 2017-04-27 | 分类于 网络技术 |


sysname Playcrab-Core          修改交换机默认名字

super password level 3 cipher XXX          增加交换机超级密码

vlan batch 10 20 30 40 50 52 60 70 72 76          批量新建vlan

undo telnet server enable             关闭交换机telnet访问

observe-port 1 interface GigabitEthernet4/0/44        配置高速以太口4/0/44口为镜像口

undo http server enable        关闭web页面访问交换机

radius-server template XXX      配置radius模版

radius-server shared-key cipher XXX        配置radius共享密钥

radius-server authentication 172.16.XX.XX 1812      radius认证服务器地址及端口

radius-server retransmit 2       配置Radius实时记帐包发送间隔时间为2分钟

undo radius-server user-name domain-included radius    认证不加域名

acl number 3000            创建访问控制列表

description meeting         控制列表描述是会议

rule 1000 deny ip source 172.16.X.X  0.0.0.X destination 172.16.X.X  

0.0.X.X          拒绝源176.16.X.X,访问目标172.16.X.X

定义流策略
traffic classifier c_meeting operator or precedence 5
if-match acl 3000
定义流动作
traffic behavior b_permit
permit
引用流策略和流动作
traffic policy p_meeting
classifier c_meeting behavior b_permit
访问控制列表在虚拟接口vlan76,进的方向策略生效
vlan 76
traffic-policy p_meeting inbound

#

创建dhcp中继服务组,并指定服务组的IP地址
dhcp server group 1
dhcp-server 172.16.X.X 0
#
dhcp server group 2
dhcp-server 172.16.X.X 1

#
aaa                开启AAA服务

authentication-scheme default      默认使用本地认证

authentication-scheme XX.com      配置aaa认证域模版

authentication-mode radius local     配置使用radius认证

authorization-scheme default      默认授权方式

accounting-scheme default       默认计费方式

domain default      默认域

domain XXX       创建AAA默认域

authentication-scheme XXX.com      应用认证域

radius-server XXX.com        radius认证模版

local-user admin password cipher XXX      配置admin密码

local-user admin service-type telnet terminal ssh web 8021x http  授权admin用登陆方式
#
ntp-service unicast-server 172.16.X.X     指向时间同步服务器
#
interface Vlanif10         进入vlan10虚拟接口

description to_chanpinfuwu        描述vlan10是产品服务

ip address 172.16.X.X 255.255.X.0        配置IP地址及其掩码

dhcp select relay        开启dhcp中继

dhcp relay server-select 1         dhcp中继指向中继组1

interface Eth-Trunk1         创建聚合组Eth-Trunk1

description To Playcrab-FireWall        描述Eth-Trunk1连接Playcrab-FireWall

port link-type trunk        端口链路类型为中继链路

port trunk pvid vlan 255        设置端口的默认vlan标签

undo port trunk allow-pass vlan 1        禁止vlan1通过中继链路端口

port trunk allow-pass vlan 255            允许vlan255通过中继链路端口

#
interface GigabitEthernet4/0/47           进入高速以太口

description To Playcrab-FrieWall-G0/0/1          描述连接防火墙的G0/0/1口

eth-trunk 1         加入聚合组1

ip route-static 0.0.0.0 0.0.0.0 172.16.X.X        配置默认路由

#
snmp-agent       开启交换机snmp服务

snmp-agent community read cipher XXX         配置snmp的团体名为XXX

snmp-agent sys-info version all        设置系统启用的snmp的版本号
#
ssh authentication-type default password        SSH认证类型,默认密码认证

#
user-interface con 0        进入交换机console口

authentication-mode password        密码认证模式

set authentication password cipher XXX       设置密码XXX为密文
#
user-interface vty 0 4         创建vty虚拟终端

authentication-mode aaa         认证模式为AAA

protocol inbound ssh         接入类型使用ssh

编译安装LAMP

发表于 2017-03-31 | 分类于 Linux系统 |

目前的web服务器多是用LAMP来搭建的。所谓的LAMP,指的是几款开源软件的组合构成的动态web网站系统。

L=Linux A=Apache M=Mysql P=PHP/Perl/Python。

我们主要来说一下编译安装:

1.安装apache

先下载好相关的源码包:这里下载的是httpd-2.2.21.tar

新建一个文件夹,取名software :mkdir /root/software

把下载的httpd-2.2.21.tar放在该目录下

注意,检查一下GCC开发工具]在安装软件之前要确保GCC等开发工具都已经安装妥当。

再检查httpd是否已经停用,因为系统会安装自带的Apache,不管你是否选择安装它。

一切ok,开始安装。

[解压源代码]

[进入源码目录]

[编译配置]

./configure –prefix=/usr/local/apache –enable-so –enable-rewrite

[编译并安装]

[启动Apache]

[测试是否正常]

添加开机自动启动httpd服务

cp /usr/local/apache/bin/apachectl /etc/rc.d/init.d/httpd

chkconfig –add httpd

vim /etc/rc.d/init.d/httpd

添加上
#chkconfig:345 85 15
#description: Start and stops the Apache HTTP Server

然后

chmod +x /etc/rc.d/init.d/httpd

chkconfig –add httpd

然后可以用setup命令进入服务设置,设置为开机启动

2.安装mysql

首先确保系统中没有安装过mysql

下载源码包到/root/software/目录下 mysql-5.1.55.tar.gz

[创建MySQL使用的系统用户与组]

useradd –M –s /sbin/nologin mysql #添加mysql这个用户,同时添加到mysql组里,不给登陆shell

[解压源代码]

[进入源码目录]

[编译并安装]

checking for termcap functions library… configure: error: No curses/termcap library found

[root@localhost mysql-5.1.55]# make

make: * 没有指明目标并且找不到 makefile。 停止。

如果报这个错误,说明没有安装ncurses这个包

拷贝my-medium.cnf文件到/etc/目录下并重命名为my.cnf

修改字符集

[client]

default-character-set=utf8

[mysqld]

重启mysql

查看字符集设置

[初始化数据及调整权属]

[注册MySQL数据库程序库路径] 可以暂时不设置 echo “/usr/local/mysql/lib/mysql” >> /etc/ld.so.conf 注:其它的一些应用程序在使用MySQL数据库的时候,需要用到MySQL提供接口程序库;因此要
把这个程序库的有效路径注册到Linux中,以便其它应用程序能够找到。

[启动MySQL并设置数据库管理员密码]

变量,这样可以不用进入到mysql的安装目录下进行mysql操作
或者做个软连接:

ln -s /usr/local/mysql/bin/mysql /usr/bin/mysql

添加mysql开机自动启动

cp /root/soft/mysql-5.1.55/support-files/mysql.server /etc/init.d/
mysqld

cd /etc/init.d/

chkconfig –add mysqld

chkconfig mysqld on

[登录数据库测试]

测试成功

3.安装PHP

1、检查各种库源文件

如果发现没有相应的库,我们需要下载一个编译安装。

例如:jpegsrc 这个库。我们下载的是jpegsrc.v8b.tar.gz包。安装后进入到该目录:

–enable-shared 参数必须家,意思是创建共享库。

然后编译安装

注:GD库,是图形图像处理扩展库,提供了处理图片的API,有了它PHP才能正确处理GIF、JPEG、PNG等图形图像格式。如下:

[解压源码包]

[编译前配置]

[编译并安装]

[复制php.ini配置文件]

[修改Apache主配置文件httpd.conf]添加支持PHP环境的相关配置。

[进行测试]

在/usr/local/apache/htdocs 目录下创建一个index.php文件

编辑index.php文件

保存退出。重启apache服务/usr/local/apache/bin/apachectl -k restart

打开浏览器看是否支持php

如果弹出的是下载该项,重启一下服务器

弹出该画面,说明php安装编译成功。

华为S5700配置SSH和Raidus

发表于 2017-03-28 | 分类于 网络技术 |

clock timezone beijing add 8     配置交换机时区

sys

undo cluster enable

rsa local-key-pair create     创建交换机密钥

y

1024     密钥长度默认512

sysname C02     修改交换机名

vlan batch 10 20 30 40 50 60 70 72 76 78     批量创建vlan

vlan batch 80 84 90 100 110 255

interface vlan 255     创建并进入vlan 虚拟接口

ip add 172.16.xx.xx 24     配置ip地址

quit     退出当前视图

radius-server template xx.com     配置radius模版

radius-server authentication 172.16.xx.xx 1812      radius认证服务器地址及端口

radius-server shared-key cipher xx     radius共享密钥

radius-server retransmit 2

undo radius-server user-name domain-included     raius认证不加域名

quit

aaa     配置aaa模版

authentication-scheme xx.com     配置aaa认证域模版

authentication-mode radius local     配置使用radius认证

quit

domain xx.com     创建aaa认证域

authentication-scheme xx.com     应用认证域

radius-server xx.com     应用radius认证模版

quit

local-user admin password cipher xxxx     配置admin密码

local-user admin service-type ssh telnet     授权admin用户登录方式

quit

user-interface vty 0 4     创建vty虚拟终端

authentication-mode aaa     使用aaa认证方式

protocol inbound ssh     接入类型使用ssh

undo user privilege level     取消本地用户等级授权

undo set authentication password

quit

stelnet server enable     开启ssh服务

ssh authentication-type default password     ssh使用密码认证

ip route-static 0.0.0.0 0.0.0.0 172.16.xx.xx     配置默认路由

snmp-agent     开启snmp

snmp-agent sys-info version all     snmp兼容多版本

snmp-agent community read cipher xxxx     输入snmp团体名称

info-center loghost 172.16.xx.xx facility local5     指向syslog日志服务器

user-interface console 0     进入console接口

authentication-mode password     使用本地密码认证

set authentication password cipher xxxx     设置密码为密文

quit

super password cipher xxxx     设置超级密码认证

undo mac-authen timer reauthenticate-period

interface Vlanif1     进入vlan1虚拟接口

shutdown     停用vlan 1接口

undo ip address dhcp-alloc     停用dhcp

quit

undo telnet server enable     停用telnet服务

y

lldp en     开启链路发现协议

dhcp en     启用dhcp服务

dhcp snooping enable     启用dhcp窥探

interface Eth-Trunk1     创建聚合端口1

port link-type trunk     配置端口类型为trunk

port trunk pvid vlan 255     将trunk打标记为255

port trunk allow-pass vlan all     放行所有vlan通过

undo port trunk allow-pass vlan 1     禁止vlan 1通过

dhcp snooping trusted     信任dhcp窥探

quit

port-group 1     创建端口组

group-member GigabitEthernet 0/0/1 to GigabitEthernet 0/0/24    将1到24端口加入该组

shutdown     关闭该组下所有端口

port link-type acces     配置端口类型为access

ntdp enable    开启邻居拓扑发现协议

ndp enable     开启发现直连设备信息协议

bpdu enable     开启BPDU桥协议数据单元,防止环路产生,一般配合stp使用

loopback-detect enable     开启环路检测协议

loopback-detect action shutdown     发现环路进行关闭端口操作

dhcp snooping enable     开启dhcp窥探功能

ip source check user-bind enable   将dhcp窥探信息进行绑定

br 40     限制广播数据包为40%完整命令(broadcast-suppression)

port de v 10     配置端口所属vlan

un sh     启用端口

quit

undo port-group 1     删除端口组

interface GigabitEthernet 0/1/1     进入光端口

e 1     加入到聚合端口Eth-Trunk1

interface GigabitEthernet 0/1/2

e 1

quit

quit

sa       保存配置

y

Extmail

发表于 2017-03-26 | 分类于 邮件系统 |

一、系统环境

(1)编译环境

  [root@web_mail]# yum install gcc gcc-c++

(2)依赖软件

  [root@web_mail]# yum install openssl openssl-devel cyrus-sasl libtool-ltdl libtool-ltdl-devel db4 db4-devel expect expect-devel pcre pcre-devel

(3)LAMP环境

  [root@web_mail]# yum install httpd httpd-devel mysql mysql-server mysql-devel php php-mysql

(4)设置mysql,apache开机启动

  [root@web_mail ~]# chkconfig mysqld on

  [root@web_mail ~]# chkconfig httpd on

二、安装POSTFIX

(1)安装

  [root@web_mail ~]# yum install postfix

(2)配置

  [root@web_mail ~]# cd /etc/postfix/

  [root@web_mail postfix]# postconf -n > /etc/postfix/main2.cf

  [root@web_mail postfix]# mv main.cf main.cf.old

  [root@web_mail postfix]# mv main2.cf main.cf

  [root@web_mail postfix]# vi main.cf

#inet_interfaces = localhost 注释掉下面这行,否则25端口只能本地连接
#添加以下基本配置
mynetworks = 127.0.0.1  
myhostname = mail.xxx.com 主机设置
mydestination = $myhostname, localhost.$mydomain, localhost
mail_name = Postfix - by playdod.com
smtpd_banner = $myhostname ESMTP $mail_name
smtpd_error_sleep_time = 0s
message_size_limit = 10485760 邮件大小10M
mailbox_size_limit = 2097152000 邮箱大小2G
show_user_unknown_table_name = no
bounce_queue_lifetime = 1d
maximal_queue_lifetime = 1d

(3)启动

  [root@web_mail postfix]# service postfix start

  [root@web_mail postfix]# chkconfig postfix on

  [root@web_mail postfix]# ps aux|grep postfix

  [root@web_mail postfix]# netstat -tlnp|grep 25

(4)检查

  [root@web_mail postfix]# postfix check

  [root@web_mail postfix]# postconf –a   出现cyrus表示可以支持cyrus认证用户

  [root@web_mail postfix]# postconf -m   出现mysql表示可以支持mysql存储账号

三、安装Courier-Authlib

(1)安装

  [root@web_mail postfix]# groupadd vmail -g 1002

  [root@web_mail postfix]# useradd vmail -u 1002 -g 1002 -d /home/domains

  [root@web_mail postfix]# cd /usr/local/src

  [root@web_mail src]#wget http://cznic.dl.sourceforge.net/project/courier/authlib/0.66.1/
courier-authlib-0.66.1.tar.bz2

  [root@web_mail src]# tar -jxf courier-authlib-0.66.1.tar.bz2

  [root@web_mail src]# cd courier-authlib-0.66.1

  [root@web_mail courier-authlib-0.66.1]# ./configure –with-mysql-libs –with-mysql-includes   –with-authmysql –with-authmysql=yes –with-mailuser=vmail –with-mailgroup=vmail

  [root@web_mail courier-authlib-0.66.1]# make && make install

  [root@web_mail courier-authlib-0.66.1]# make install-configure

(2)修改配置文件

  [root@web_mail courier-authlib-0.66.1]# cd /usr/local/etc/authlib

  [root@web_mail authlib]# vi authmysqlrc

MYSQL_SERVER localhost
MYSQL_USERNAME extmail
MYSQL_PASSWORD extmail
MYSQL_SOCKET /var/lib/mysql/mysql.sock
MYSQL_PORT 3306
MYSQL_OPT 0
MYSQL_DATABASE extmail
MYSQL_USER_TABLE mailbox
MYSQL_CRYPT_PWFIELD password
MYSQL_UID_FIELD 1002
MYSQL_GID_FIELD 1002
MYSQL_LOGIN_FIELD username
MYSQL_HOME_FIELD homedir
MYSQL_NAME_FIELD name
MYSQL_MAILDIR_FIELD maildir
MYSQL_QUOTA_FIELD quota
MYSQL_SELECT_CLAUSE SELECT username,password,"",uidnumber,gidnumber,\
CONCAT('/home/domains/',homedir), \
CONCAT('/home/domains/',maildir), \
quota, \
name \
FROM mailbox \
WHERE username = '$(local_part)@$(domain)'

  [root@web_mail authlib]# vi authdaemonrc

authmodulelist="authmysql"
authmodulelistorig="authmysql"

  [root@web_mail authlib]# ln -s /usr/local/etc/authlib /etc/authlib

(3)启动

  [root@web_mail authlib]# /usr/local/sbin/authdaemond start

  [root@web_mail authlib]# ps aux|grep authdaemond

  [root@web_mail authlib]# echo “/usr/local/sbin/authdaemond start” >> /etc/rc.d/rc.local

四、安装Maildrop

(1) 安装Courier-Unicode

  [root@web_mail authlib]# cd /usr/local/src

  [root@web_mail src]# tar -jxf courier-unicode-1.1.tar.bz2

  [root@web_mail src]# cd courier-unicode-1.1

  [root@web_mail courier-unicode-1.1]# ./configure

  [root@web_mail courier-unicode-1.1]# make && make install

(2) 安装Maildrop

  [root@web_mail courier-unicode-1.1]# cd /usr/local/src

  [root@web_mail src]# tar -jxf maildrop-2.7.2.tar.bz2

  [root@web_mail src]# cd maildrop-2.7.2

  [root@web_mail maildrop-2.7.2]# ./configure
–enable-maildirquota –enable-maildrop-uid=1002 –enable-maildrop-gid=1002 –with-trashquota

  [root@web_mail maildrop-2.7.2]# make && make install

(3) 配置

  [root@web_mail maildrop-2.7.2]# vi /etc/postfix/master.cf

maildrop unix - n n - - pipe
flags=DRhu user=vmail argv=/usr/local/bin/maildrop -w 90 -d ${user}@${nexthop} ${recipient} ${user} ${extension} {nexthop}

[root@web_mail maildrop-2.7.2]# vi /etc/postfix/main.cf

maildrop_destination_recipient_limit = 1

五、安装Webmail前台

(1)安装

  [root@web_mail src]# tar -zxvf extmail-1.2.tar.gz

  [root@web_mail src]# tar -zxvf extman-1.1.tar.gz

  [root@web_mail src]# mkdir /var/www/extsuite

  [root@web_mail src]# mv extman-1.1 /var/www/extsuite/extman

  [root@web_mail src]# mv extmail-1.2 /var/www/extsuite/extmail

(2)配置extmail

  [root@web_mail src]# cd /var/www/extsuite

  [root@web_mail extsuite]# cp extmail/webmail.cf.default extmail/webmail.cf

  [root@web_mail extsuite]# vi extmail/webmail.cf

SYS_MYSQL_USER = extmail
SYS_MYSQL_PASS = extmail

(3)配置extman

  [root@web_mail extsuite]# mkdir /var/www/extsuite/extman/session

  [root@web_mail extsuite]# cp extman/webman.cf.default extman/webman.cf

  [root@web_mail extsuite]# vi extman/webman.cf

SYS_SESS_DIR = /var/www/extsuite/extman/session/
SYS_DEFAULT_UID = 1002
SYS_DEFAULT_GID = 1002

(4)初始化数据库

[1] 给数据库root用户设置密码

  [root@web_mail extsuite]# service mysqld restart

  [root@web_mail extsuite]# mysql –uroot

  mysql> set password for root@localhost=password(‘123456’);

  mysql> quit

[2] 导入extmail数据库

  [root@web_mail extsuite]# mysql -uroot -p123456 < extman/docs/extmail.sql

[3] 修改参数后导入数据

  [root@web_mail extsuite]#sed –i ‘s/extmail.org/playdod.com/g’ extman/docs/init.sql

  [root@web_mail extsuite]# sed -i ‘s/1000/1002/g’ extman/docs/init.sql

  [root@web_mail extsuite]# mysql -uroot -p123456 </var/www/extsuite/extman/docs/init.sql

[4] 查看数据库

  [root@web_mail extsuite]# mysql -uroot -p123456

  mysql> use extmail;

  > show tables;

  mysql> select username,uidnumber,gidnumber from mailbox;

(5)配置postfix

  [root@webmail extsuite]# cp extman/docs/mysql*.cf /etc/postfix/

  [root@web_mail extsuite]# vi /etc/postfix/main.cf

virtual_alias_maps = mysql:/etc/postfix/mysql_virtual_alias_maps.cf
virtual_mailbox_domains = mysql:/etc/postfix/mysql_virtual_domains_maps.cf
virtual_mailbox_maps = mysql:/etc/postfix/mysql_virtual_mailbox_maps.cf
virtual_transport = maildrop
virtual_uid_maps = static:1002
virtual_gid_maps = static:1002

(6)设置权限和属主

  [root@web_mail extsuite]# chown root.root -R extmail extman

  [root@web_mail extsuite]# chown -R vmail:vmail extmail/cgi/ extman/cgi/ extman/session

(7)配置Apache虚拟主机

  [root@web_mail extsuite]# vi /etc/httpd/conf.d/extmail.conf

# VirtualHost for ExtMail Solution
NameVirtualHost *:80
<VirtualHost *:80>
ServerName mail.xx.com
DocumentRoot /var/www/extsuite/extmail/html/
ScriptAlias /extmail/cgi/ /var/www/extsuite/extmail/cgi/
Alias /extmail /var/www/extsuite/extmail/html/
ScriptAlias /extman/cgi/ /var/www/extsuite/extman/cgi/
Alias /extman /var/www/extsuite/extman/html/
# Suexec config
SuexecUserGroup vmail vmail
</VirtualHost>

(8)重启服务

  [root@web_mail extsuite]# service postfix restart

  [root@web_mail extsuite]# service httpd restart

(9)建立Maildir

[1] 手动建立Maildir

用于存放用户邮件的目录;在WEB上创建其他域名邮箱,会在此自动建立相应域
名目录。

  [root@web_mail extsuite]# cd extman/tools

  [root@web_mail tools]#
./maildirmake.pl /home/domains/playdod.com/postmaster/Maildir

  [root@web_mail tools]# chown -R vmail:vmail /home/domains

[2]测试authlib认证登录账号

  [root@web_mail tools]# /usr/local/sbin/authtest -s login postmaster@playdod.com extmail

(10)安装其他依赖包

[1]安装绘图工具

  [root@web_mail tools]# yum install -y rrdtool rrdtool-perl

[2]安装依赖perl模块

  [root@web_mail tools]# yum install -y cpan perl

  [root@web_mail tools]# yum install -y perl-YAML perl-Test-Exception
perl-Crypt-PasswdMD5 perl-GD perl-CGI perl-Time-HiRes

  [root@web_mail tools]# perl -MCPAN -e ‘install Time::HiRes::Value’

  [root@web_mail tools]# perl -MCPAN -e ‘install File::Tail’

  [root@web_mail tools]# perl -MCPAN -e ‘install Unix::Syslog’

  [root@web_mail tools]# perl -MCPAN -e ‘install DB_File’

  [root@web_mail tools]# perl -MCPAN -e ‘install Encode::HanExtra’

[3]启动进程

  [root@web_mail tools]# cd /var/www/extsuite/extman

  [root@web_mail extman]# cp -R addon/mailgraph_ext/ /usr/local/

  [root@web_mail extman]# /usr/local/mailgraph_ext/mailgraph-init start


  [root@web_mail extman]# ps aux|grep mailgraph_ext


  [root@web_mail extman]# /var/www/extsuite/extman/daemon/cmdserver -v -d

  [root@web_mail extman]# ps aux|grep cmdserver


  [root@web_mail extman]#echo “/usr/local/mailgraph_ext/mailgraph-init
start” >> /etc/rc.d/rc.local

[root@web_mail extman]# echo “/var/www/extsuite/extman/daemon/cmdserver
-v -d” >> /etc/rc.d/rc.local

[4]定时任务

  [root@web_mail extman]# crontab -e

0 4 * * * /var/www/extsuite/extman/tools/expireusers.pl -all postmaster@playdod.com
30 4 * * * /var/www/extsuite/extman/tools/reportusage.pl -all /home/domains postmaster@playdod.com

  [root@web_mail extman]# service crond restart

  [root@web_mail extsuite]# vi /var/www/extsuite/extman/webman.cf   取消管理后台登陆验证码

SYS_CAPTCHA_ON = 0

(11)测试web访问

[1]访问邮箱

<1>帐号:postmaster

<2>密码:extmail

<3>域名:xxx.com

[2]访问邮箱后台

<1>帐号: root@xx.com

<2>密码: xxxx*

(12)检查Maildrop

[1]查看版本信息

  [root@web_mail extsuite]# maildrop –v


[2]测试maildrop连接

  [root@web_mail extsuite]# echo “test” | maildrop -V 10 -d postmaster@playdod.com


六、安装Cyrus-SASL使Postfix支持SMTP认证

(1)系统已默认安装Cyrus-SASL

  [root@mail ~]# rpm -aq|grep cyrus-sasl


(2)配置cyrus-sasl

vi /etc/sasl2/smtpd.conf


  [root@web_mail ~]# chmod 755 /usr/local/var/spool/authdaemon

(3)配置postfix

  [root@web_mail ~]# vi /etc/postfix/main.cf


  [root@web_mail ~]# service postfix restart

(4)测试SMTP认证

  [root@web_mail ~]# perl -e ‘use MIME::Base64; print encode_base64

(“postmaster\@playdod.com”)’

  [root@web_mail ~]# perl -e ‘use MIME::Base64; print encode_base64(“extmail”)’

  [root@web_mail ~]# yum install -y telnet

  [root@web_mail ~]# telnet localhost 25

Connected to localhost.
Escape character is '^]'.
220 mail.playdod.com ESMTP Postfix - by playdod.com
ehlo localhost
250-mail.playdod.com
250-PIPELINING
250-SIZE 10485760
250-VRFY
250-ETRN
250-STARTTLS
250-AUTH LOGIN PLAIN
250-AUTH=LOGIN PLAIN
250-ENHANCEDSTATUSCODES
250-8BITMIME
250 DSN
auth login
334 VXNlcm5hbWU6
cG9zdG1hc3RlckBwbGF5ZG9kLmNvbQ==
334 UGFzc3dvcmQ6
YWJjZC4xMjM0
235 2.7.0 Authentication successful
quit
221 2.0.0 Bye
Connection closed by foreign host.

七、实现POP3、IMAP基本功能

(1)安装Courier-IMAP

  [root@web_mail ~]# cd /usr/local/src

  [root@web_mail ~]#=wget http://ncu.dl.sourceforge.net/project/courier/imap/
4.15.1/courier-imap-4.15.1.tar.bz2

  [root@web_mail src]# tar -jxf courier-imap-4.15.1.tar.bz2

  [root@web_mail src]# cd courier-imap-4.15.1

  [root@web_mail courier-imap-4.15.1]# ./configure –enable-workarounds-for-imap-client-bugs –with-authchangepwdir –enable-unicode –with-trashquota –disable-root-check

  [root@web_mail courier-imap-4.15.1]# make && make install

  [root@web_mail courier-imap-4.15.1]# make install-configure

(2)启动程序

  [root@web_mail courier-imap-4.15.1]# cd /usr/lib/courier-imap/

  [root@web_mail courier-imap]# /usr/lib/courier-imap/libexec/imapd.rc start

  [root@web_mail courier-imap]# echo “/usr/lib/courier-imap/libexec/imapd.rc
start” >> /etc/rc.local

  [root@web_mail courier-imap]# ps aux|grep imapd


  [root@web_mail courier-imap]# netstat -tnlp|grep 143


  [root@web_mail courier-imap]# /usr/lib/courier-imap/libexec/pop3d.rc start

  [root@web_mail courier-imap]# echo “/usr/lib/courier-imap/libexec/pop3d.rc
start” >> /etc/rc.local

  [root@web_mail courier-imap]# ps aux|grep pop3d


  [root@web_mail courier-imap]# netstat -tnlp|grep 110


(3)设置imapd、pop3为启用状态

  [root@web_mail courier-imap]# sed -i ‘s/IMAPDSTART=NO/IMAPDSTART=YES/g’ etc/imapd

  [root@web_mail courier-imap]# sed -i ‘s/POP3DSTART=NO/POP3DSTART=YES/g’ etc/pop3d

(4)测试端口连接

  [root@web_mail courier-imap]# telnet localhost 110

Connected to localhost.
Escape character is '^]'.
+OK Hello there.
user postmaster@playdod.com
+OK Password required.
pass abcd.1234
+OK logged in.
list
+OK POP3 clients that break here, they violate STD53
1 665
2 665
3 871
4 3245
5 695
6 3297
quit
+OK Bye-bye.
Connection closed by foreign host

  [root@web_mail courier-imap]# telnet localhost 143

Connected to localhost.
Escape character is '^]'.
* OK [CAPABILITY IMAP4rev1 UIDPLUS CHILDREN NAMESPACE THREAD=ORDEREDSUBJECT THREAD=REFERENCES SORT QUOTA IDLE ACL ACL2=UNION STARTTLS] Courier-IMAP ready. Copyright 1998-2011 Double Precision, Inc. See COPYING for distribution information.
tag login postmaster@playdod.com abcd.1234
tag OK LOGIN Ok.
tag logout
* BYE Courier-IMAP server shutting down
tag OK LOGOUT completed
Connection closed by foreign host.

八、Webmail支持FCGI

(1)装apache的mod_fastcgi模块

  [root@web_mail ~]# yum install -y httpd-devel

  [root@web_mail ~]# cd /usr/local/src

  [root@web_mail src]# wget http://www.fastcgi.com/dist/mod_fastcgi-2.4.6.tar.gz

  [root@web_mail src]# tar zxvf mod_fastcgi-2.4.6.tar.gz

  [root@web_mail src]# cd mod_fastcgi-2.4.6

  [root@web_mail mod_fastcgi-2.4.6]# cp Makefile.AP2 Makefile

  [root@web_mail mod_fastcgi-2.4.6]# find / -name “build” -type d

  [root@web_mail mod_fastcgi-2.4.6]# make top_dir=/usr/lib64/httpd/ install

(2)查看模块是否生成

  [root@web_mail mod_fastcgi-2.4.6]# ls /etc/httpd/modules/mod_fastcgi.so

(3)安装Extmail需要的perl-FCGI模块

  [root@web_mail mod_fastcgi-2.4.6]# yum install perl-FCGI

  [root@web_mail mod_fastcgi-2.4.6]# vi /etc/httpd/conf.d/extmail.conf

(4)配置虚拟主机文件

  /Users/yx/blog/source/F6F44294-9C5F-40E1-B9C6-FB25DA663BB4.png

(5)修改启动脚本,并启动

  [root@web_mail mod_fastcgi-2.4.6]# vi /var/www/extsuite/extmail/dispatch-init
SU_UID=vmail

SU_GID=vmail

  [root@web_mail mod_fastcgi-2.4.6]# /var/www/extsuite/extmail/dispatch-init start

  [root@web_mail mod_fastcgi-2.4.6]# echo “/var/www/extsuite/extmail
/dispatch-init start” >> /etc/rc.d/rc.local

  [root@web_mail mod_fastcgi-2.4.6]# service httpd restart

  [root@web_mail mod_fastcgi-2.4.6]# ps aux|grep dispatch.fcgi


  [root@web_mail mod_fastcgi-2.4.6]# netstat -tnlp|grep 8888


1234
孤独泪

孤独泪

时间是一切财富中最宝贵的财富

17 日志
5 分类
17 标签
GitHub 微博
友情衔接
  • 超哥
  • 小白
  • 亚可
  • 明明
  • 小健
  • 大侠
  • 强哥
  • 高洋
© 2017 孤独泪
由 Hexo 强力驱动
主题 - NexT.Pisces